JAVA: Read and Write PPM, PGM images in JAVA

Download the code library from HERE
Also you can download some sample PPM and PGM images from here.

The following helps to setup the project using Eclipse.
This requires 2 Image Processing libraries which are included in the zip. [jai_imageio.jar and clibwrapper_jiio.jar]
If you are not using eclipse, please add these 2 libraries to your project.

After opening Eclipse:

1. Goto File->New->Java Project
2. In the "contents" section, select the radio button "create project from existing source"
3. Click browse to point to the downloaded ImgProcTool folder (Assuming u have unzipped the file)
4. Click Finish on the "new Java Project" window.

TEST IT BY EXECUTING THE PROJECT
A simple sample program IpToolTester.java is included, which reads and writes a sample PGM image.
 public class IpToolTester {  
     public static void main(String[] args) {  
           ImageTool imageTool = new ImageTool();  
           String srcPath = "lena_384.pgm";  
           
           Image srcImg = new Image(srcPath);  
           Image tgtImg = new Image();  
           tgtImg.init(srcImg.getNumRows(), srcImg.getNumCols());  
           imageTool.copyImg(srcImg, tgtImg);  
           tgtImg.save("lena_write.pgm");  
           System.out.println("Done");  
      }  
 }  
5. Right click on the project and select "Run as->java application"
6. If everything is fine, there will be console output ending with "Done".
7. Refresh the project, you will see a new .pgm file "lena_write.pgm".
Mac: Installing OOMMF on Mac OS X Snow Leopard 10.6

Mac OS have TCL/TK already installed.
So it is very easy to install OOMMF(Object Oriented MicroMagnetic Framework)

The following steps installs OOMMF at directory ~/apps/oommf12a4pre-20091216

First you need to download the oommf SOURCE code.
Here is the link to download 1.2a4pre snapshots : http://math.nist.gov/~MDonahue/misc/oommf12a4pre-20091216.tar.gz

Once you have downloaded untar to ~/apps/ using the following command in the terminal.
gunzip -c oommf12a4_20040908.tar.gz | tar xvf -

To Install:
Open Terminal and goto to the folder where you untarred.
 $ cd ~/apps/oommf12a4pre-20091216  
Run the following 2 commands
 $ tclsh oommf.tcl +platform
The above command prints summary of your platform configuration. Make sure all the config files are located and listed. Example output will be like the following
 oommf.tcl 1.2.0.4 info:  
 OOMMF release 1.2.0.4, snapshot 2009.12.16  
 Platform Name:          darwin  
 Tcl name for OS:     Darwin 10.7.0  
 C++ compiler:          /usr/bin/g++   
 Tcl configuration file:     /usr/lib/tclConfig.sh  
 tclsh:               /usr/bin/tclsh8.5  
 Tcl release:          8.5.7 (config)     8.5.7 (running)  
 Tk configuration file:     /usr/lib/tkConfig.sh  
 wish:               /usr/bin/wish8.5  
 Tk release:          8.5.7 (config)     8.5.7 (running)  
 Tcl threads:          Yes  
 OOMMF threads:          Yes  
  Default thread count:     2  
Now you have all the configurations good, to compile and build run the following command
 $ tclsh oommf.tcl pimake  
The above command runs for a while. If there is an error, it prints the error on the console.
To launch the application
 $ tclsh oommf.tcl  

Mac: Set Up Apache Virtual Hosts on Mac OS X Snow Leopard 10.6

There 3 simple steps to set Up Apache Virtual Hosts on Mac OS X Snow Leopard (10.6.x)
If you dont have time or lazy to follow these 3 simple steps, you can use a script http://code.google.com/p/virtualhost-sh/

Step A:
 1. Open httpd.conf located at /private/etc/apache2/httpd.conf  
Open it using "vi" in terminal or open it using "text wrangler". Donot open using any word processing program, they will add unwanted characters into the file.

2. Find the line #Include /private/etc/apache2/extra/httpd-vhosts.conf
Remove the "#" at the beginning.Now it must look like
 # Virtual hosts
Include /private/etc/apache2/extra/httpd-vhosts.conf  

Step B:
1. Open httpd-vhosts.conf located at
 /private/etc/apache2/extra/httpd-vhosts.conf 
Open it using "vi" in terminal or open it using "text wrangler". Donot open using any word processing program, they will add unwanted characters into the file.

2. There will be 2 existing dummy examples, you could modify one of to suit your needs. For example I modified to as:
 <VirtualHost *:80>  
   DocumentRoot "/Library/WebServer/Documents/mydemo"  
   ServerName mydemo.local  
   ErrorLog "/private/var/log/apache2/mydemo.local-error_log"  
   CustomLog "/private/var/log/apache2/mydemo.local-access_log" common  
 </VirtualHost>  

STEP C:
 1. Open hosts located at /private/etc/hosts  
Open it using "vi" in terminal or open it using "text wrangler". Donot open using any word processing program, they will add unwanted characters into the file.

2. Add a new line to specify your new virtual host. For example, I added the following line
 127.0.0.1  mydemo.local

Final STEP D:
1. Save all the edited files : httpd.conf, httpd-vhosts.conf, hosts
2. Restart Apache web server: System Preferences > Sharing > Web Sharing, uncheck and check web sharing
3. DONE ! Your virtual host is ready to use.

XML: Simple internal DTD definition example

Best way to validate is using any browser. Open the XML file in any browser.
Also, if you open in Eclipse, you can right click on the .xml file and select "validate".

 <?xml version="1.0"?>  
 <!DOCTYPE notes [  
  <!ELEMENT notes  (note*)>  
  <!ELEMENT note  (to,from,heading,body*)>  
  <!ELEMENT to   (#PCDATA)>  
  <!ELEMENT from  (#PCDATA)>  
  <!ELEMENT heading (#PCDATA)>  
  <!ELEMENT body  (#PCDATA)>  
 ]>  
 <notes>  
      <note>  
           <to>Joe</to>  
           <from>Tom</from>  
           <heading>Hello</heading>  
      </note>  
      <note>  
           <to>Bob</to>  
           <from>Joe</from>  
           <heading>Reminder</heading>  
           <body>this is msg</body>  
      </note>  
 </notes>  

PHP: startsWith endsWith functions

 
function startsWith($needle, $haystack){  
    return preg_match('/^'.preg_quote($needle)."/", $haystack);  
}  

function endsWith($needle, $haystack){  
    return preg_match("/".preg_quote($needle) .'$/', $haystack);  
}  

Mac: Cool Expose Shortcuts/Features in Snow Leopard

Cool Features of Expose in Mac OSX Snow Leopard
With all windows visible (press Expose key [F3] or swipe 4 fingers down on Mac Books).
  • press Command-1 to arrange the windows by name.
  • press Command-2 to arrange windows by application.
  • Press the Tab key to view all windows belonging to one application. Press Tab again to switch between applications while remaining in Expose. You can also click an icon in the dock.
  • Hover your mouse pointer over a window and press the spacebar to view a larger Quick Look version of that window.
  • if you mouse over a window in Expose view , that window will have a blue border. When it does, press the spacebar. That window will now grow to full size -- while still within the Expose view! Now, if you move your mouse over an other window that one will grow to full size while the previous one reverts.

PHP: exec command not working; sh: command not found

When using PHP exec command, if you find sh: Command not found , error in your web server logs, you have to export the full path of that command.

Assuming, that command in /opt/local/bin, change the command to
 $cmd ='export PATH=$PATH:/opt/local/bin; myCommand 2>&1';  
 echo exec($cmd,$out);  

To debug PHP exec command, Read this

For example:
For the PHP code:
 $cmd = "gmake";  
 echo exec($cmd,$out);  

There will be no output. In your web server error log, your will have :
 sh: gmake: command not found  
To fix this, we need to export the PATH of the gmake.

Go to your terminal, find where your command is located, In this example:
 $ which gmake  
 /opt/local/bin/gmake  

So, modify you PHP code as following:
 $cmd ='export PATH=$PATH:/opt/local/bin; gmake 2>&1';  
 echo exec($cmd,$out) ;

This will output, on your web page
 gmake: *** No targets specified and no makefile found. Stop.  

PHP: exec command not working; debugging exec command

While using PHP exec command, if it is not working , Follow these to debug

1. Check your web server error_log.
Usually in MAC, for APACHE web server, it is located at /var/log/apache2/
1.1 Case1: the web server does not have permission to read/execute a command/file.
Solution to Case1: Simple, change file permissions.

1.2 Case2: The exec command will throw sh: Command Not found
Solution to Case2: Read this

2. Append 2>&1 to your command to get std errors as well. Read this for more info

PHP: Today, Yesterday, Tomorrow dates

In PHP, we can generate Today, Yesterday, Tomorrow Dates the following way:
 $today = date('Y-m-d');  
 $tomorrow = date('Y-m-d', strtotime('tomorrow'));  
 $yesterday = date('Y-m-d', strtotime('yesterday'));  

MySQL: Make a copy of an existing table in MySQL

We can create a copy of an existing table using the following SQL statements.
 CREATE TABLE booger_copy LIKE testing.booger;  
 INSERT booger_copy SELECT * FROM testing.booger;  
If you want to copy only half of the existing table then, you can use LIMIT keyword in the select Query

Mac: Running 32-bit JVM on Mac OSX using eclipse

I had to use SMILE API on 64-bit Mac OSX machine.
SMILE API provides 32-bit version of their binaries.

I found a way to use 32-bit JVM in Mac OSX 64bit machines using Eclipse.
By default Mac OSX comes with both 32 bit and 64bit JVM installed.
Eclipse uses 64-bit JVM by default.

In order to use the 32-bit JVM, do the following in Eclipse
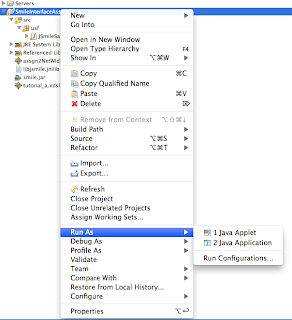
1. Right Click on your project, goto "Run As", Select "Run Configurations"
2. Select the Arguments tab,
3. Add “-d32″ in VM arguments field.


Using Filezilla to login into Amazon EC2 instance and transfer files

We can login into Amazon EC2 instance using Filezilla FTP client for simple transfers of local files.
Following are the steps:

1. Download and install Filezilla client.
2. Goto Filezilla settings(Windows) or Filezlla preferences (MAC)
3. Click on SFTP, on right side, click on add key file.


4. Select your .pem file. It will prompt you to convert into PPK file.


5. Click ok to close the settings/preferences window.
6. Open site manager, create a new site as show in the image below.
Host: your AMI address
ServerType: SFTP
Logon Tpe: Normal
User: ec2-user
No password required ! Filezilla will read through the keys and find the right key for the user/server pair that you are connecting to.

Using cURLpp software

To use the curlpp, we need to first install.

Download the package at  http://curlpp.org/index.php/download

The simplest way to compile this package is:

  1. `cd' to the directory containing the package's source code and type
     `./configure'

  2. Type `make' to compile the package.

  3. Type `make install' to install, if error occurs do 'sudo make install'

  4. You can remove the program binaries and object files from the
     source code directory by typing `make clean'.

After installing, there are several examples at http://curlpp.org/index.php/examples
cURLpp is a C++ wrapper for libcURL.
libcURL is described as:
a free and easy-to-use client-side URL transfer library, supporting FTPFTPSHTTPHTTPSGOPHERTELNETDICTFILE and LDAP. libcurl supports HTTPScertificates, HTTP POSTHTTP PUTFTP uploading, kerberos, HTTP form based upload, proxies, cookies, user+password authentication, file transfer resume, http proxy tunneling and more!

PHP: exec command to get std errors

By appending 2>&1 at the end of the command will redirect errors from stderr to stdout.
Example:
If you run a simple command like cc at the command prompt, you would get the output as following
 $ cc  
 i686-apple-darwin10-gcc-4.2.1: no input files  
 $  
If u run the same command using PHP exec command
 $cmd = "cc";  
 exec($cmd,$out);  
 print_r($out);  
The output would be and empty array:
 Array ( )  
So, In order to get the error string as well, we need to append 2>&1
 $cmd = "cc 2>&1";  
 exec($cmd,$out);  
 print_r($out);  
The output will print:
 Array ( [0] => i686-apple-darwin10-gcc-4.2.1: no input files )  

Mac: location of Apache web server logs

The following location contains error_log for apache web server in Mac machines
 /var/log/apache2/  

Python contextlib for Timing Python code

If you've ever found yourself needing to measure the execution time of specific portions of your Python code, the `contextlib` module o...