Showing posts with label Mac. Show all posts

Connecting to Ubuntu Remote Desktop from Mac OS

Connecting to Ubuntu or any linux server via Mac OS:
-- Access the "Spotlight" by hitting CMD + Space-bar
-- Within the Spotlight field, enter vnc://your_server_ip:5900

If you get an error when connecting to Ubuntu from Mac OS using VNC screen sharing:
"The software on the remote computer appears to be incompatible with this version of Screen Sharing."
On Ubuntu 18.04:
$ gsettings set org.gnome.Vino require-encryption false
Verify the setting with
$ gsettings list-recursively org.gnome.Vino | grep encrypt

Mac: Install OPEN MPI on Mac OS

Step 1 : If you haven't installed XCODE. Download and Install XCODE

Step 2 :
Install Open MPI. Download the latest stable release of Open MPI from the Open Source High Performance Computing website.

Step 3:
Open terminal and Go to the downloaded directory

Extract the downloaded archive :
tar -zxvf openmpi-1.6.5.tar.gz

Open terminal and Go to the extracted directory:
cd /path/to/extracted/openmpi-1.6.5

Run the following commands
./configure --prefix=/usr/local
make all
sudo make install

Step 4: Add OpenMPI path to your path, run the following commands export

PATH=/usr/local/openmpi/bin:$PATH
export LD_LIBRARY_PATH=/usr/local/openmpi/lib:$LD_LIBRARY_PATH
export DYLD_LIBRARY_PATH=$LD_LIBRARY_PATH

Step 5: Compile your C/C++ program
For C:
mpicc -o myProgExe myProg.c

For C++:
mpic++ -o myProgExe myProg.cpp

Step 6: Run, where -np is the number of processor to run on.
mpirun -np 8 myProgExe


Run Internet Explorer 7, 8, and 9 in Mac OS X


Source: http://osxdaily.com/2011/09/04/internet-explorer-for-mac-ie7-ie8-ie-9-free/


Following is the post from osxdaily.com

Notes: the admin password for all of the IE VMs is “Password1″ without the quotes. This has been tested and confirmed to work with Mac OS X 10.7 Lion and Mac OS X 10.6 Snow Leopard.
  1. Download & Install VirtualBox – Download Now (direct .dmg download link) – visit VirtualBox Downloads page
  2. Launch the Terminal (located in /Applications/Utilities/)
  3. Decide which versions of Internet Explorer you want to download and install – each version of Internet Explorer is contained within a separate virtual machine that runs within VirtualBox. In other words, if you want to run Internet Explorer 7, 8, and 9, you will need to download three separate VM’s, which may take a while so keep that in mind. Select the text below and copy it:
    • Install ALL versions of Internet Explorer: IE7, IE 8, and IE 9

    • curl -s https://raw.github.com/xdissent/ievms/master/ievms.sh | bash
    • Install Internet Explorer 7 Only

    • curl -s https://raw.github.com/xdissent/ievms/master/ievms.sh | IEVMS_VERSIONS="7" bash
    • Install Internet Explorer 8 Only

    • curl -s https://raw.github.com/xdissent/ievms/master/ievms.sh | IEVMS_VERSIONS="8" bash
    • Install Internet Explorer 9 Only

    • curl -s https://raw.github.com/xdissent/ievms/master/ievms.sh | IEVMS_VERSIONS="9" bash
  4. Copy and paste the selected command from above into the Terminal and hit return, this will start the download and conversion process. How long this takes depends on your internet connection and how many versions of Internet Explorer you chose to install
  5. Launch VirtualBox and boot Windows & Internet Explorer – select the virtual machine corresponding to the version of Internet Explorer you intend to use: IE7, IE8, IE9, then click on the “Start” button to boot that Windows machine with that version of Internet Explorer.
Remember that the default Windows admin password is “Password1″, it’s also the password hint within the VM should you forget it. 
That’s really all there is to it. These commands are part of the ievsms script from xdissent and it manages the entire download, conversion, and installation procedure, it doesn’t get much easier.
VM Snapshots Circumvent Microsofts 30 Day Limitation
The other great thing about this method is that it circumvents Microsofts 30 day limitation by utilizing snapshots, a feature built into VirtualBox. This preserves the original Windows VM state and allows you to continuously use the IE virtual machine without any time limitation simply by reverting to the original snapshot once the 30 day lock occurs.
To use a snapshot after the 30 day Windows expiration, just open VirtualBox, select the IE VM, and click on the “Snapshots” button. From here you can boot from the original snapshot that was created and use IE again for another 30 days. You can do this indefinitely, effectively having a clean IE test environment forever.

Mac: Take a screenshot in different ways

In Mac OS X, there are 3 ways to take a screenshot.

1. Cmd+Shift+3 : Capture the entire screen.

2. Cmd+Shift+4 : Capture a selected area of your screen. The cursor will turn into a crosshair and you can drag around the area you want to capture.

3. Cmd+Shift+4+Spacebar : Capture a specific window or Dock or menu bar. The crosshair will turn into a little camera and highlight the window or objects you can capture. Left Click to capture.
You can use Expose shortcut to switch between windows. After you switch press alt or cmd key to get the little camera. Left Click to capture.

Mac: Mac OS X 10.6.8 Printing Issue, and a Fix

With the recent update to Mac OS X 10.6.8, the printing does not work.
After updating to 10.6.8, you might be Getting “paused printer” message

Download Fix Here

For More details, View This Post 

Mac: Installing OOMMF on Mac OS X Snow Leopard 10.6

Mac OS have TCL/TK already installed.
So it is very easy to install OOMMF(Object Oriented MicroMagnetic Framework)

The following steps installs OOMMF at directory ~/apps/oommf12a4pre-20091216

First you need to download the oommf SOURCE code.
Here is the link to download 1.2a4pre snapshots : http://math.nist.gov/~MDonahue/misc/oommf12a4pre-20091216.tar.gz

Once you have downloaded untar to ~/apps/ using the following command in the terminal.
gunzip -c oommf12a4_20040908.tar.gz | tar xvf -

To Install:
Open Terminal and goto to the folder where you untarred.
 $ cd ~/apps/oommf12a4pre-20091216  
Run the following 2 commands
 $ tclsh oommf.tcl +platform
The above command prints summary of your platform configuration. Make sure all the config files are located and listed. Example output will be like the following
 oommf.tcl 1.2.0.4 info:  
 OOMMF release 1.2.0.4, snapshot 2009.12.16  
 Platform Name:          darwin  
 Tcl name for OS:     Darwin 10.7.0  
 C++ compiler:          /usr/bin/g++   
 Tcl configuration file:     /usr/lib/tclConfig.sh  
 tclsh:               /usr/bin/tclsh8.5  
 Tcl release:          8.5.7 (config)     8.5.7 (running)  
 Tk configuration file:     /usr/lib/tkConfig.sh  
 wish:               /usr/bin/wish8.5  
 Tk release:          8.5.7 (config)     8.5.7 (running)  
 Tcl threads:          Yes  
 OOMMF threads:          Yes  
  Default thread count:     2  
Now you have all the configurations good, to compile and build run the following command
 $ tclsh oommf.tcl pimake  
The above command runs for a while. If there is an error, it prints the error on the console.
To launch the application
 $ tclsh oommf.tcl  

Mac: Set Up Apache Virtual Hosts on Mac OS X Snow Leopard 10.6

There 3 simple steps to set Up Apache Virtual Hosts on Mac OS X Snow Leopard (10.6.x)
If you dont have time or lazy to follow these 3 simple steps, you can use a script http://code.google.com/p/virtualhost-sh/

Step A:
 1. Open httpd.conf located at /private/etc/apache2/httpd.conf  
Open it using "vi" in terminal or open it using "text wrangler". Donot open using any word processing program, they will add unwanted characters into the file.

2. Find the line #Include /private/etc/apache2/extra/httpd-vhosts.conf
Remove the "#" at the beginning.Now it must look like
 # Virtual hosts
Include /private/etc/apache2/extra/httpd-vhosts.conf  

Step B:
1. Open httpd-vhosts.conf located at
 /private/etc/apache2/extra/httpd-vhosts.conf 
Open it using "vi" in terminal or open it using "text wrangler". Donot open using any word processing program, they will add unwanted characters into the file.

2. There will be 2 existing dummy examples, you could modify one of to suit your needs. For example I modified to as:
 <VirtualHost *:80>  
   DocumentRoot "/Library/WebServer/Documents/mydemo"  
   ServerName mydemo.local  
   ErrorLog "/private/var/log/apache2/mydemo.local-error_log"  
   CustomLog "/private/var/log/apache2/mydemo.local-access_log" common  
 </VirtualHost>  

STEP C:
 1. Open hosts located at /private/etc/hosts  
Open it using "vi" in terminal or open it using "text wrangler". Donot open using any word processing program, they will add unwanted characters into the file.

2. Add a new line to specify your new virtual host. For example, I added the following line
 127.0.0.1  mydemo.local

Final STEP D:
1. Save all the edited files : httpd.conf, httpd-vhosts.conf, hosts
2. Restart Apache web server: System Preferences > Sharing > Web Sharing, uncheck and check web sharing
3. DONE ! Your virtual host is ready to use.

Mac: Cool Expose Shortcuts/Features in Snow Leopard

Cool Features of Expose in Mac OSX Snow Leopard
With all windows visible (press Expose key [F3] or swipe 4 fingers down on Mac Books).
  • press Command-1 to arrange the windows by name.
  • press Command-2 to arrange windows by application.
  • Press the Tab key to view all windows belonging to one application. Press Tab again to switch between applications while remaining in Expose. You can also click an icon in the dock.
  • Hover your mouse pointer over a window and press the spacebar to view a larger Quick Look version of that window.
  • if you mouse over a window in Expose view , that window will have a blue border. When it does, press the spacebar. That window will now grow to full size -- while still within the Expose view! Now, if you move your mouse over an other window that one will grow to full size while the previous one reverts.

Mac: Running 32-bit JVM on Mac OSX using eclipse

I had to use SMILE API on 64-bit Mac OSX machine.
SMILE API provides 32-bit version of their binaries.

I found a way to use 32-bit JVM in Mac OSX 64bit machines using Eclipse.
By default Mac OSX comes with both 32 bit and 64bit JVM installed.
Eclipse uses 64-bit JVM by default.

In order to use the 32-bit JVM, do the following in Eclipse
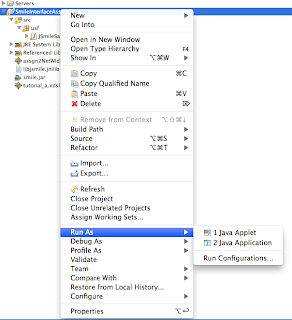
1. Right Click on your project, goto "Run As", Select "Run Configurations"
2. Select the Arguments tab,
3. Add “-d32″ in VM arguments field.


Mac: location of Apache web server logs

The following location contains error_log for apache web server in Mac machines
 /var/log/apache2/  

Mac: Flush DNS cache in Snow Leapord

Run the following command in the terminal
sudo dscacheutil -flushcache

For Windows:
ipconfig /flushdns

Mac: removing known hosts/ ssh-rsa keys /RSA key fingerprint.

1. Open known_hosts file located at  /Users/username/.ssh/known_hosts or ~/.ssh/known_hosts
2. Delete the CONTENTS of the file.

Since .ssh is a hidden folder, you can show/hide hidden folders using directions at mac-showhide-files-in-mac

Mac: Show/hide Hidden files in Mac OS

To Show Hidden files run the following 2 commands in the terminal

defaults write com.apple.finder AppleShowAllFiles TRUE

killall Finder


To Hide Hidden files run the following 2 commands in the terminal.

defaults write com.apple.finder AppleShowAllFiles FALSE

killall Finder

Mac : check if my intel based Mac is 32-bit or 64-bit

1. Choose About This Mac from the Apple () menu in the upper-left menu bar
2. See what Processor it has.
3. Compare your Processor Name to information below to determine whether your Mac has a 32-bit or 64-bit processor.


Processor Name  
32- or 64-bit
Intel Core Solo
32 bit
Intel Core Duo
32 bit
Intel Core 2 Duo
64 bit
Intel Quad-Core Xeon
64 bit
Dual-Core Intel Xeon
64 bit
Quad-Core Intel Xeon
64 bit

Source: Extracted from http://support.apple.com/kb/ht3696

Open a File Browser From Your Current Command Prompt/Terminal Directory


Open Finder in Mac OS X, the terminal type
open .

Open a File Browser in Windows, in the command prompt type:
explorer .
OR
start .

Open a File Browser in Linux, in the terminal type
nautilus .
OR
gnome-open .


ShiftIt: Windows 7 Aero Snap for Your Mac !

Wondered if you wanted to get the smart resizing introduced in Windows 7 on your Mac ?

Well Try this http://code.google.com/p/shiftit/
ShiftIt is a free download for Mac OS X only.

Theres another software Called Cinch http://www.irradiatedsoftware.com/cinch/ ,but you need to pay for it !

Mac OS X Fixing Warning: mysql_connect(): Can't connect to local MySQL server through socket '/var/mysql/mysql.sock'

How to fix Warning: mysql_connect(): Can't connect to local MySQL server through socket '/var/mysql/mysql.sock'

Apparently, Mac OS X doesn't allow for PHP MySQL connection out of the box. You get this:

    Warning: mysql_connect(): Can't connect to local MySQL server through socket '/var/mysql/mysql.sock'
OR In CakePHP
Warning: Could not connect to Database.

I found the most clear fix here:

    /etc/php.ini(.default) looks for mysql.sock in the wrong place... two options are to make a symbolic link from the right place to the socket...

    sudo mkdir /var/mysql
    sudo ln -s /private/tmp/mysql.sock /var/mysql/mysql.sock

    Or you can update your php.ini (.default) by finding "mysql.default_socket" and setting it to equal /private/tmp/mysql.sock and then restart apache web server

Mac: 4 easy steps to Install Tomcat on Mac OSX Snow Leapord


4 easy steps to Install Tomcat on Snow Leopard.

STEP 1: -- Download Tomcat 6, Binary Distribution, under Core (zip or tar.gz) from http://tomcat.apache.org/download-60.cgi
-- Unzip the downloaded package.

STEP 2: -- Change directories to Library
      cd /Library
-- Create the Tomcat directory
    mkdir Tomcat

-- Copy the unzipped downloaded package: apache-tomcat-6.0.x
-- Paste it in this newly created Directory : /Library/Tomcat. 

STEP 3:
-- Edit the shell local startup script. Create if it does not exist.
nano ~/.profile
-- Add the following 2 lines to the .profile file: (BASH)
-- Remember in apache-tomcat-6.0.x, the 'x' refers to what ever version # you have downloaded
export JAVA_HOME=/Library/Java/Home
export CATALINA_HOME=/Library/Tomcat/apache-tomcat-6.0.x

STEP 4:
-- Open a new Terminal window. Execute the following
-- cd /Library/Tomcat/apache-tomcat-6.0.x/conf
-- Edit the tomcat-users.xml file
nano tomcat-users.xml
-- Add the following, where admin is the administrator name you assign and password is the password
<user username="admin" password="password" roles="standard,manager,admin"/>

-- The tomcat-users.xml file should look something like this:

<tomcat-users>
<!--
<roll rollname="tomcat"/>
<roll rollname="role1"/>
<user username="tomcat" password="tomcat" roles="tomcat" />
<user username="role1" password="tomcat" roles="role1" />
<user username="both" password="tomcat" roles="tomcat,role1" />
-->
<user username="admin" password="password" roles="standard,manager,admin"/>
</tomcat-users>


-- Save the tomcat-users.xml file and quit the editor

And This is it....
Now, to start tomcat
-- Execute the Tomcat startup script located under /Library/Tomcat/apache-tomcat-6.0.x/bin
-- ./startup.sh
-- Test it by opening the page : http://localhost:8080/

Now, to stop tomcat
-- Execute the Tomcat startup script located under /Library/Tomcat/apache-tomcat-6.0.x/bin
-- ./shutdown.sh


Python contextlib for Timing Python code

If you've ever found yourself needing to measure the execution time of specific portions of your Python code, the `contextlib` module o...