Step 1 : If you haven't installed XCODE. Download and Install XCODE
Step 2 :
Install Open MPI. Download the latest stable release of Open MPI from the Open Source High Performance Computing website.
Step 3:
Open terminal and Go to the downloaded directory
Extract the downloaded archive :
tar -zxvf openmpi-1.6.5.tar.gz
Open terminal and Go to the extracted directory:
cd /path/to/extracted/openmpi-1.6.5
Run the following commands
./configure --prefix=/usr/local
make all
sudo make install
Step 4: Add OpenMPI path to your path, run the following commands
export
PATH=/usr/local/openmpi/bin:$PATH
export LD_LIBRARY_PATH=/usr/local/openmpi/lib:$LD_LIBRARY_PATH
export DYLD_LIBRARY_PATH=$LD_LIBRARY_PATH
Step 5: Compile your C/C++ program
For C:
mpicc -o myProgExe myProg.c
For C++:
mpic++ -o myProgExe myProg.cpp
Step 6: Run, where -np is the number of processor to run on.
mpirun -np 8 myProgExe
Gmail Tricks ;), Get more usage out of your Gmail address !
1. Create Filters with multiple Senders
Use the 'OR' keyword in between emails.
Set up the filter as "email1@gmail.com OR email2@gmail.com" and continue from there.
2. The Plus Sign (+) in your Gmail address
For example you have an email address: ravi@gmail.com, then

So from next time when u register, which requires your email, or when you post a contact email on your website. You can create a filter and manage these emails to be automatically archived, deleted, etc...
3. The dot Sign (.) in your Gmail address
For example you have an email address: ravi@gmail.com, then
Use the 'OR' keyword in between emails.
Set up the filter as "email1@gmail.com OR email2@gmail.com" and continue from there.
2. The Plus Sign (+) in your Gmail address
For example you have an email address: ravi@gmail.com, then
- ravi@gmail.com = ravi+anything@gmail.com = ravi+socialmedia@gmail.com
Gmail ignores anything after the + sign. But sends/recieves with the full email address.
So, Why do you want to use the + sign ? To manage junk and unwanted emails :)
You can use this kind of email address at some social or coupon websites to register and later manage(probably delete) all their associated emails or notifications.
So for example, you could register at these websites with ravi+couponjunk@gmail.com . And then create a filter with ravi+couponjunk@gmail.com and you can continue from there...

So from next time when u register, which requires your email, or when you post a contact email on your website. You can create a filter and manage these emails to be automatically archived, deleted, etc...
3. The dot Sign (.) in your Gmail address
For example you have an email address: ravi@gmail.com, then
- ravi@gmail.com = r.a.v.i@gmail.com = ra.vi@gmail.com = r.av.i@gmail.com
Gmail ignores periods (.) as characters in email addresses.
jQuery: Disable backgroud scrolling when simplemodal modal box is opened.
When using jQuery simplemodal, when the modal box is box is opened , following is one way to disable the scrolling in the background.
We change the css overflow property of the background in the onShow and onClose functions..
Example:
We change the css overflow property of the background in the onShow and onClose functions..
Example:
$("#sample").modal({
      maxWidth:800, minHeight:800,
       onShow: function(dialog) {
                 $("html,body").css("overflow","hidden");
                 //YOur remaining javascript...
            },
       onClose: function(dialog) {
                 $("html,body").css("overflow","auto");
                 $.modal.close();
            }
 });
CakePHP: Update model after changing database
After changes are made in the Database, to see the changes updated or reflect to the cakephp models, do the following
- Delete all the temporary model files from
app/tmp/cache/models/*. - In app/Config/core.php, change the debug value from 0 to 3, load your app in browser and again change it from 3 to 0
Run Internet Explorer 7, 8, and 9 in Mac OS X

Source: http://osxdaily.com/2011/09/04/internet-explorer-for-mac-ie7-ie8-ie-9-free/
Following is the post from osxdaily.com
Notes: the admin password for all of the IE VMs is “Password1″ without the quotes. This has been tested and confirmed to work with Mac OS X 10.7 Lion and Mac OS X 10.6 Snow Leopard.
- Download & Install VirtualBox – Download Now (direct .dmg download link) – visit VirtualBox Downloads page
- Launch the Terminal (located in /Applications/Utilities/)
- Decide which versions of Internet Explorer you want to download and install – each version of Internet Explorer is contained within a separate virtual machine that runs within VirtualBox. In other words, if you want to run Internet Explorer 7, 8, and 9, you will need to download three separate VM’s, which may take a while so keep that in mind. Select the text below and copy it:
Install ALL versions of Internet Explorer: IE7, IE 8, and IE 9
curl -s https://raw.github.com/xdissent/ievms/master/ievms.sh | bash
Install Internet Explorer 7 Only
curl -s https://raw.github.com/xdissent/ievms/master/ievms.sh | IEVMS_VERSIONS="7" bash
Install Internet Explorer 8 Only
curl -s https://raw.github.com/xdissent/ievms/master/ievms.sh | IEVMS_VERSIONS="8" bash
Install Internet Explorer 9 Only
curl -s https://raw.github.com/xdissent/ievms/master/ievms.sh | IEVMS_VERSIONS="9" bash
- Copy and paste the selected command from above into the Terminal and hit return, this will start the download and conversion process. How long this takes depends on your internet connection and how many versions of Internet Explorer you chose to install
- Launch VirtualBox and boot Windows & Internet Explorer – select the virtual machine corresponding to the version of Internet Explorer you intend to use: IE7, IE8, IE9, then click on the “Start” button to boot that Windows machine with that version of Internet Explorer.
Remember that the default Windows admin password is “Password1″, it’s also the password hint within the VM should you forget it.
That’s really all there is to it. These commands are part of the ievsms script from xdissent and it manages the entire download, conversion, and installation procedure, it doesn’t get much easier.
VM Snapshots Circumvent Microsofts 30 Day Limitation
The other great thing about this method is that it circumvents Microsofts 30 day limitation by utilizing snapshots, a feature built into VirtualBox. This preserves the original Windows VM state and allows you to continuously use the IE virtual machine without any time limitation simply by reverting to the original snapshot once the 30 day lock occurs.
To use a snapshot after the 30 day Windows expiration, just open VirtualBox, select the IE VM, and click on the “Snapshots” button. From here you can boot from the original snapshot that was created and use IE again for another 30 days. You can do this indefinitely, effectively having a clean IE test environment forever.
Following is the post from osxdaily.com
Notes: the admin password for all of the IE VMs is “Password1″ without the quotes. This has been tested and confirmed to work with Mac OS X 10.7 Lion and Mac OS X 10.6 Snow Leopard.
Install ALL versions of Internet Explorer: IE7, IE 8, and IE 9
Install Internet Explorer 7 Only
Install Internet Explorer 8 Only
Install Internet Explorer 9 Only
curl -s https://raw.github.com/xdissent/ievms/master/ievms.sh | bashcurl -s https://raw.github.com/xdissent/ievms/master/ievms.sh | IEVMS_VERSIONS="7" bashcurl -s https://raw.github.com/xdissent/ievms/master/ievms.sh | IEVMS_VERSIONS="8" bashcurl -s https://raw.github.com/xdissent/ievms/master/ievms.sh | IEVMS_VERSIONS="9" bashThe other great thing about this method is that it circumvents Microsofts 30 day limitation by utilizing snapshots, a feature built into VirtualBox. This preserves the original Windows VM state and allows you to continuously use the IE virtual machine without any time limitation simply by reverting to the original snapshot once the 30 day lock occurs.
SVN: Moving subversion repository from one server to another server
This works between any kind of servers windows or linux...
Step 1: Backup / create a dump of old repository
Step 2: Create a new repository on the new server
Step 3: Import the the old repository
Step 1: Backup / create a dump of old repository
svnadmin dump /path/to/repository > repo_name.dump
Step 2: Create a new repository on the new server
svnadmin create /path/to/repository
Step 3: Import the the old repository
svnadmin load /path/to/repository < repo_name.dump
Matlab: Sort 2D array with respect to one column
sort function in Matlab, sorts matrix columns independently.
But,
B = sortrows(A, column) sorts the matrix based on the columns specified in the vector column.
Example:
>> A = [2 10; -1 20; 5 40]
A =
2 10
-1 50
5 15
>> sortrows(A, 1)
ans =
-1 50
2 10
5 15
>> sortrows(A, 2)
ans =
2 10
-1 50
5 15
But,
B = sortrows(A, column) sorts the matrix based on the columns specified in the vector column.
Example:
>> A = [2 10; -1 20; 5 40]
A =
2 10
-1 50
5 15
>> sortrows(A, 1)
ans =
-1 50
2 10
5 15
>> sortrows(A, 2)
ans =
2 10
-1 50
5 15
MATLAB: String tokenizer, string split
myStr = 'one_two_three';
pieces = regexp(myStr , '_', 'split')
%Output would be an pieces array with 3 elements.
pieces =
'one' 'two' 'three'
pieces = regexp(myStr , '_', 'split')
%Output would be an pieces array with 3 elements.
pieces =
'one' 'two' 'three'
Academy Excellence Award 2011 to Dr. P Seetharamaiah

The Prime Minister, Dr. Manmohan Singh presenting the Academy Excellence Award 2011 to Dr. P Seetharamaiah, at the DRDO Awards presentation ceremony, in New Delhi on July 31, 2012. The Defence Minister, Shri A. K. Antony is also seen.
Generate 2048 CSR using openssl
openssl req -new -nodes -subj "/C=US/ST=Florida/L=Tampa/O=My Org Pvt Limited/OU=Some Dept/CN=abc.xyz.com" -keyout private.txt -out certreq.txt -newkey rsa:2048
Minify/compress JavaScript, CSS compressor
Quick and easy way to minify/compress JavaScript and CSS
- JS Compress and Obfuscate : http://www.minifyjs.com/javascript-obfuscator/
- JS Compress only: http://www.minifyjs.com/javascript-compressor/
- CSS compressor : http://www.minifycss.com/css-compressor/
UNIX: Bash Keyboard shortcuts
Very useful neat shortcuts for traversing in Bash command line :)
Command Editing Shortcuts
- Ctrl + a – go to the start of the command line
- Ctrl + e – go to the end of the command line
- Ctrl + k – delete from cursor to the end of the command line
- Ctrl + u – delete from cursor to the start of the command line
- Ctrl + w – delete from cursor to start of word (i.e. delete backwards one word)
- Ctrl + y – paste word or text that was cut using one of the deletion shortcuts (such as the one above) after the cursor
- Ctrl + xx – move between start of command line and current cursor position (and back again)
- Alt + b – move backward one word (or go to start of word the cursor is currently on)
- Alt + f – move forward one word (or go to end of word the cursor is currently on)
- Alt + d – delete to end of word starting at cursor (whole word if cursor is at the beginning of word)
- Alt + c – capitalize to end of word starting at cursor (whole word if cursor is at the beginning of word)
- Alt + u – make uppercase from cursor to end of word
- Alt + l – make lowercase from cursor to end of word
- Alt + t – swap current word with previous
- Ctrl + f – move forward one character
- Ctrl + b – move backward one character
- Ctrl + d – delete character under the cursor
- Ctrl + h – delete character before the cursor
- Ctrl + t – swap character under cursor with the previous one
Command Recall Shortcuts
- Ctrl + r – search the history backwards
- Ctrl + g – escape from history searching mode
- Ctrl + p – previous command in history (i.e. walk back through the command history)
- Ctrl + n – next command in history (i.e. walk forward through the command history)
- Alt + . – use the last word of the previous command
Command Control Shortcuts
- Ctrl + l – clear the screen
- Ctrl + s – stops the output to the screen (for long running verbose command)
- Ctrl + q – allow output to the screen (if previously stopped using command above)
- Ctrl + c – terminate the command
- Ctrl + z – suspend/stop the command
Bash Bang (!) Commands
- !! - run last command
- !blah – run the most recent command that starts with ‘blah’ (e.g. !ls)
- !blah:p – print out the command that !blah would run (also adds it as the latest command in the command history)
- !$ – the last word of the previous command (same as Alt + .)
- !$:p – print out the word that !$ would substitute
- !* – the previous command except for the last word (e.g. if you type ‘find some_file.txt /‘, then !* would give you ‘find some_file.txt‘)
- !*:p – print out what !* would substitute
jQuery: Select a radio button by name and value
Using jQuery, if you want to select a specific radio button based on name and value
$(':radio[name="radioBtnName"][value="radioValue"]');
Example:
<div id="radioGrps">
   <div id="setOne">
       <input type="radio" name="orange" value="5" />
       <input type="radio" name="orange" value="10" checked />
       <input type="radio" name="orange" value="20" />
   </div>
   <div id="setTwo">
      <input type="radio" name="peach" value="10" />
      <input type="radio" name="peach" value="15" />
      <input type="radio" name="peach" value="20" checked />
  </div>
 </div>
In the above example,
if you want to select radio button in div#setOne with value 10, then
$('#setOne :radio[name="orange"][value="10"]');
 or
 $(':radio[name="orange"][value="10"]');
 //to make it checked
 $(':radio[name="orange"][value="10"]').attr('checked', 'checked');
Eclipse color theme
Download eclipse color theme plugin for easy installation of several color themes for your Eclipse IDE.
If you are on Eclipse 3.5 (Galileo), go to Help→Install New Software..., press Add Site and enterEclipse Color Theme as the name and http://eclipse-color-theme.github.com/update as the URL. Then select the new entry from the select box labeled Work with, mark Eclipse Color Theme for installation and proceed.
After the installation, go to Window→Preferences→General→Appereance→Color Theme to change the color theme.
If you are on Eclipse 3.6 (Helios), the easiest way to install the plugin is from the Eclipse Marketplace. Go to Help→Eclipse Marketplace..., then search for Eclipse Color Theme and install it.
If you are on Eclipse 3.5 (Galileo), go to Help→Install New Software..., press Add Site and enterEclipse Color Theme as the name and http://eclipse-color-theme.github.com/update as the URL. Then select the new entry from the select box labeled Work with, mark Eclipse Color Theme for installation and proceed.
After the installation, go to Window→Preferences→General→Appereance→Color Theme to change the color theme.
Mac: Take a screenshot in different ways
In Mac OS X, there are 3 ways to take a screenshot.
1. Cmd+Shift+3 : Capture the entire screen.
2. Cmd+Shift+4 : Capture a selected area of your screen. The cursor will turn into a crosshair and you can drag around the area you want to capture.
3. Cmd+Shift+4+Spacebar : Capture a specific window or Dock or menu bar. The crosshair will turn into a little camera and highlight the window or objects you can capture. Left Click to capture.
You can use Expose shortcut to switch between windows. After you switch press alt or cmd key to get the little camera. Left Click to capture.
jQuery: get specific list item by id
Consider the following html snippet
You can get a specific list item using jQuery
<div id="fruits">
      <ul>
           <li id="5">Apples</li>
           <li id="29">Oranges</li>
           <li id="32">Peaches</li>
           <li id="47">Bananas</li>
           <li id="30">Grapes</li>
      </ul>
 </div>
You can get a specific list item using jQuery
$jq("#fruits ul li[id=32]");
Mac: Mac OS X 10.6.8 Printing Issue, and a Fix
With the recent update to Mac OS X 10.6.8, the printing does not work.
After updating to 10.6.8, you might be Getting “paused printer” message
Download Fix Here
For More details, View This Post
After updating to 10.6.8, you might be Getting “paused printer” message
Download Fix Here
For More details, View This Post
Unix: Get total size of mutliple folders or files
The following command gives the total size of the folders you have selected at the end of the list.
 $ du -sch foo/ dummy/ data/ booger/
 3G     foo/
 2G     dummy/
 9G     data/
 5G     booger/
 19G    total
MySQL: Resetting auto-increment value of a table
During development, usually we want to delete records from the table manually, then the tables auto-increment column remains where it was. We might want to reset the auto-increment value for the table.
For example, if you delete records with id's 7,8,9
Now when you insert through application, it inserts the new record starting at 10. But we want it to start at 7.
Use the following SQL to reset to a specific value
If you want to delete all records from your table and restart auto-index at 1, then
For example, if you delete records with id's 7,8,9
Now when you insert through application, it inserts the new record starting at 10. But we want it to start at 7.
Use the following SQL to reset to a specific value
ALTER TABLE my_table AUTO_INCREMENT=7
If you want to delete all records from your table and restart auto-index at 1, then
TRUNCATE TABLE my_table
MySQL: Calculate DATE, TIME difference in SQL statement using MySQL DB
Following examples showing how to calculated DATE, TIME differences in SQL statement in MySQL database.
Functions used in the following examples are TIMEDIFF and DATEDIFF
Functions used in the following examples are TIMEDIFF and DATEDIFF
 select TIMEDIFF('2011-10-31 12:50:56' , '2011-09-23 12:50:21')
 The above outputs : 838:59:59
select TIMEDIFF('15:50:56' , '12:55:21')
The above SQL outputs: 02:55:35 select DATEDIFF('2011-10-31 12:50:56' , '2011-09-23 12:50:21')
The above SQL outputs: 38 select DATEDIFF('2011-10-31' , '2011-09-23')
The above SQL outputs: 38
JAVA: Read and Write PPM, PGM images in JAVA
Download the code library from HERE
Also you can download some sample PPM and PGM images from here.
The following helps to setup the project using Eclipse.
This requires 2 Image Processing libraries which are included in the zip. [jai_imageio.jar and clibwrapper_jiio.jar]
If you are not using eclipse, please add these 2 libraries to your project.
After opening Eclipse:
1. Goto File->New->Java Project
2. In the "contents" section, select the radio button "create project from existing source"
3. Click browse to point to the downloaded ImgProcTool folder (Assuming u have unzipped the file)
4. Click Finish on the "new Java Project" window.
TEST IT BY EXECUTING THE PROJECT
A simple sample program IpToolTester.java is included, which reads and writes a sample PGM image.
6. If everything is fine, there will be console output ending with "Done".
7. Refresh the project, you will see a new .pgm file "lena_write.pgm".
Also you can download some sample PPM and PGM images from here.
The following helps to setup the project using Eclipse.
This requires 2 Image Processing libraries which are included in the zip. [jai_imageio.jar and clibwrapper_jiio.jar]
If you are not using eclipse, please add these 2 libraries to your project.
After opening Eclipse:
1. Goto File->New->Java Project
2. In the "contents" section, select the radio button "create project from existing source"
3. Click browse to point to the downloaded ImgProcTool folder (Assuming u have unzipped the file)
4. Click Finish on the "new Java Project" window.
TEST IT BY EXECUTING THE PROJECT
A simple sample program IpToolTester.java is included, which reads and writes a sample PGM image.
 public class IpToolTester {
     public static void main(String[] args) {
           ImageTool imageTool = new ImageTool();
           String srcPath = "lena_384.pgm";

           Image srcImg = new Image(srcPath);
           Image tgtImg = new Image();
           tgtImg.init(srcImg.getNumRows(), srcImg.getNumCols());
           imageTool.copyImg(srcImg, tgtImg);
           tgtImg.save("lena_write.pgm");
           System.out.println("Done");
      }
 }
6. If everything is fine, there will be console output ending with "Done".
7. Refresh the project, you will see a new .pgm file "lena_write.pgm".
Mac: Installing OOMMF on Mac OS X Snow Leopard 10.6
Mac OS have TCL/TK already installed.
So it is very easy to install OOMMF(Object Oriented MicroMagnetic Framework)
The following steps installs OOMMF at directory ~/apps/oommf12a4pre-20091216
First you need to download the oommf SOURCE code.
Here is the link to download 1.2a4pre snapshots : http://math.nist.gov/~MDonahue/misc/oommf12a4pre-20091216.tar.gz
Once you have downloaded untar to ~/apps/ using the following command in the terminal.
gunzip -c oommf12a4_20040908.tar.gz | tar xvf -
To Install:
Open Terminal and goto to the folder where you untarred.
To launch the application
So it is very easy to install OOMMF(Object Oriented MicroMagnetic Framework)
The following steps installs OOMMF at directory ~/apps/oommf12a4pre-20091216
First you need to download the oommf SOURCE code.
Here is the link to download 1.2a4pre snapshots : http://math.nist.gov/~MDonahue/misc/oommf12a4pre-20091216.tar.gz
Once you have downloaded untar to ~/apps/ using the following command in the terminal.
gunzip -c oommf12a4_20040908.tar.gz | tar xvf -
To Install:
Open Terminal and goto to the folder where you untarred.
$ cd ~/apps/oommf12a4pre-20091216
$ tclsh oommf.tcl +platform
 oommf.tcl 1.2.0.4 info:
 OOMMF release 1.2.0.4, snapshot 2009.12.16
 Platform Name:          darwin
 Tcl name for OS:     Darwin 10.7.0
 C++ compiler:          /usr/bin/g++
 Tcl configuration file:     /usr/lib/tclConfig.sh
 tclsh:               /usr/bin/tclsh8.5
 Tcl release:          8.5.7 (config)     8.5.7 (running)
 Tk configuration file:     /usr/lib/tkConfig.sh
 wish:               /usr/bin/wish8.5
 Tk release:          8.5.7 (config)     8.5.7 (running)
 Tcl threads:          Yes
 OOMMF threads:          Yes
  Default thread count:     2
$ tclsh oommf.tcl pimake
To launch the application
$ tclsh oommf.tcl
Mac: Set Up Apache Virtual Hosts on Mac OS X Snow Leopard 10.6
There 3 simple steps to set Up Apache Virtual Hosts on Mac OS X Snow Leopard (10.6.x)
If you dont have time or lazy to follow these 3 simple steps, you can use a script http://code.google.com/p/virtualhost-sh/
Step A:
2. Find the line #Include /private/etc/apache2/extra/httpd-vhosts.conf
Remove the "#" at the beginning.Now it must look like
Step B:
1. Open httpd-vhosts.conf located at
2. There will be 2 existing dummy examples, you could modify one of to suit your needs. For example I modified to as:
STEP C:
2. Add a new line to specify your new virtual host. For example, I added the following line
Final STEP D:
1. Save all the edited files : httpd.conf, httpd-vhosts.conf, hosts
2. Restart Apache web server: System Preferences > Sharing > Web Sharing, uncheck and check web sharing
3. DONE ! Your virtual host is ready to use.
If you dont have time or lazy to follow these 3 simple steps, you can use a script http://code.google.com/p/virtualhost-sh/
Step A:
1. Open httpd.conf located at /private/etc/apache2/httpd.conf
2. Find the line #Include /private/etc/apache2/extra/httpd-vhosts.conf
Remove the "#" at the beginning.Now it must look like
 # Virtual hosts
Include /private/etc/apache2/extra/httpd-vhosts.conf
Step B:
1. Open httpd-vhosts.conf located at
/private/etc/apache2/extra/httpd-vhosts.conf
2. There will be 2 existing dummy examples, you could modify one of to suit your needs. For example I modified to as:
 <VirtualHost *:80>
   DocumentRoot "/Library/WebServer/Documents/mydemo"
   ServerName mydemo.local
   ErrorLog "/private/var/log/apache2/mydemo.local-error_log"
   CustomLog "/private/var/log/apache2/mydemo.local-access_log" common
 </VirtualHost>
STEP C:
1. Open hosts located at /private/etc/hosts
2. Add a new line to specify your new virtual host. For example, I added the following line
127.0.0.1 mydemo.local
Final STEP D:
1. Save all the edited files : httpd.conf, httpd-vhosts.conf, hosts
2. Restart Apache web server: System Preferences > Sharing > Web Sharing, uncheck and check web sharing
3. DONE ! Your virtual host is ready to use.
XML: Simple internal DTD definition example
Best way to validate is using any browser. Open the XML file in any browser.
Also, if you open in Eclipse, you can right click on the .xml file and select "validate".
Also, if you open in Eclipse, you can right click on the .xml file and select "validate".
 <?xml version="1.0"?>
 <!DOCTYPE notes [
  <!ELEMENT notes  (note*)>
  <!ELEMENT note  (to,from,heading,body*)>
  <!ELEMENT to   (#PCDATA)>
  <!ELEMENT from  (#PCDATA)>
  <!ELEMENT heading (#PCDATA)>
  <!ELEMENT body  (#PCDATA)>
 ]>
 <notes>
      <note>
           <to>Joe</to>
           <from>Tom</from>
           <heading>Hello</heading>
      </note>
      <note>
           <to>Bob</to>
           <from>Joe</from>
           <heading>Reminder</heading>
           <body>this is msg</body>
      </note>
 </notes>
PHP: startsWith endsWith functions
function startsWith($needle, $haystack){
    return preg_match('/^'.preg_quote($needle)."/", $haystack);
}

function endsWith($needle, $haystack){
    return preg_match("/".preg_quote($needle) .'$/', $haystack);
}
Mac: Cool Expose Shortcuts/Features in Snow Leopard
Cool Features of Expose in Mac OSX Snow Leopard
With all windows visible (press Expose key [F3] or swipe 4 fingers down on Mac Books).
With all windows visible (press Expose key [F3] or swipe 4 fingers down on Mac Books).
- press Command-1 to arrange the windows by name.
- press Command-2 to arrange windows by application.
- Press the Tab key to view all windows belonging to one application. Press Tab again to switch between applications while remaining in Expose. You can also click an icon in the dock.
- Hover your mouse pointer over a window and press the spacebar to view a larger Quick Look version of that window.
- if you mouse over a window in Expose view , that window will have a blue border. When it does, press the spacebar. That window will now grow to full size -- while still within the Expose view! Now, if you move your mouse over an other window that one will grow to full size while the previous one reverts.
PHP: exec command not working; sh: command not found
When using PHP exec command, if you find sh: Command not found , error in your web server logs, you have to export the full path of that command.
Assuming, that command in /opt/local/bin, change the command to
To debug PHP exec command, Read this
For example:
For the PHP code:
There will be no output. In your web server error log, your will have :
Go to your terminal, find where your command is located, In this example:
So, modify you PHP code as following:
This will output, on your web page
Assuming, that command in /opt/local/bin, change the command to
 $cmd ='export PATH=$PATH:/opt/local/bin; myCommand 2>&1';
 echo exec($cmd,$out);
To debug PHP exec command, Read this
For example:
For the PHP code:
 $cmd = "gmake";
 echo exec($cmd,$out);
There will be no output. In your web server error log, your will have :
sh: gmake: command not found
Go to your terminal, find where your command is located, In this example:
 $ which gmake
 /opt/local/bin/gmake
So, modify you PHP code as following:
 $cmd ='export PATH=$PATH:/opt/local/bin; gmake 2>&1';
 echo exec($cmd,$out) ;
This will output, on your web page
gmake: *** No targets specified and no makefile found. Stop.
PHP: exec command not working; debugging exec command
While using PHP exec command, if it is not working , Follow these to debug
1. Check your web server error_log.
Usually in MAC, for APACHE web server, it is located at /var/log/apache2/
1.1 Case1: the web server does not have permission to read/execute a command/file.
Solution to Case1: Simple, change file permissions.
1.2 Case2: The exec command will throw sh: Command Not found
Solution to Case2: Read this
2. Append 2>&1 to your command to get std errors as well. Read this for more info
PHP: Today, Yesterday, Tomorrow dates
In PHP, we can generate Today, Yesterday, Tomorrow Dates the following way:
 $today = date('Y-m-d');
 $tomorrow = date('Y-m-d', strtotime('tomorrow'));
 $yesterday = date('Y-m-d', strtotime('yesterday'));
MySQL: Make a copy of an existing table in MySQL
We can create a copy of an existing table using the following SQL statements.
 CREATE TABLE booger_copy LIKE testing.booger;
 INSERT booger_copy SELECT * FROM testing.booger;
Mac: Running 32-bit JVM on Mac OSX using eclipse
I had to use SMILE API on 64-bit Mac OSX machine.
SMILE API provides 32-bit version of their binaries.
I found a way to use 32-bit JVM in Mac OSX 64bit machines using Eclipse.
By default Mac OSX comes with both 32 bit and 64bit JVM installed.
Eclipse uses 64-bit JVM by default.
In order to use the 32-bit JVM, do the following in Eclipse
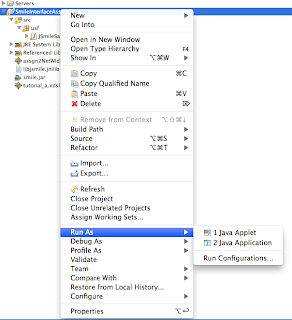
1. Right Click on your project, goto "Run As", Select "Run Configurations"
2. Select the Arguments tab,
3. Add “-d32″ in VM arguments field.
SMILE API provides 32-bit version of their binaries.
I found a way to use 32-bit JVM in Mac OSX 64bit machines using Eclipse.
By default Mac OSX comes with both 32 bit and 64bit JVM installed.
Eclipse uses 64-bit JVM by default.
In order to use the 32-bit JVM, do the following in Eclipse
1. Right Click on your project, goto "Run As", Select "Run Configurations"
2. Select the Arguments tab,
3. Add “-d32″ in VM arguments field.


Using Filezilla to login into Amazon EC2 instance and transfer files
We can login into Amazon EC2 instance using Filezilla FTP client for simple transfers of local files.
Following are the steps:
1. Download and install Filezilla client.
2. Goto Filezilla settings(Windows) or Filezlla preferences (MAC)
3. Click on SFTP, on right side, click on add key file.

4. Select your .pem file. It will prompt you to convert into PPK file.


5. Click ok to close the settings/preferences window.
6. Open site manager, create a new site as show in the image below.
Host: your AMI address
ServerType: SFTP
Logon Tpe: Normal
User: ec2-user
No password required ! Filezilla will read through the keys and find the right key for the user/server pair that you are connecting to.

Using cURLpp software
To use the curlpp, we need to first install.
Download the package at http://curlpp.org/index.php/download
The simplest way to compile this package is:
1. `cd' to the directory containing the package's source code and type
`./configure'
2. Type `make' to compile the package.
3. Type `make install' to install, if error occurs do 'sudo make install'
4. You can remove the program binaries and object files from the
source code directory by typing `make clean'.
After installing, there are several examples at http://curlpp.org/index.php/examples
cURLpp is a C++ wrapper for libcURL.
libcURL is described as:
a free and easy-to-use client-side URL transfer library, supporting FTP, FTPS, HTTP, HTTPS, GOPHER, TELNET, DICT, FILE and LDAP. libcurl supports HTTPScertificates, HTTP POST, HTTP PUT, FTP uploading, kerberos, HTTP form based upload, proxies, cookies, user+password authentication, file transfer resume, http proxy tunneling and more!
PHP: exec command to get std errors
By appending 2>&1 at the end of the command will redirect errors from stderr to stdout.
Example:
If you run a simple command like cc at the command prompt, you would get the output as following
Example:
If you run a simple command like cc at the command prompt, you would get the output as following
 $ cc
 i686-apple-darwin10-gcc-4.2.1: no input files
 $
 $cmd = "cc";
 exec($cmd,$out);
 print_r($out);
Array ( )
 $cmd = "cc 2>&1";
 exec($cmd,$out);
 print_r($out);
Array ( [0] => i686-apple-darwin10-gcc-4.2.1: no input files )
Mac: location of Apache web server logs
The following location contains error_log for apache web server in Mac machines
/var/log/apache2/
Mac: Flush DNS cache in Snow Leapord
Run the following command in the terminal
sudo dscacheutil -flushcache
For Windows:
ipconfig /flushdns
sudo dscacheutil -flushcache
For Windows:
ipconfig /flushdns
HTML: Open link in a new window
The key to use is target="_blank"
Eg:
Eg:
 <a  target="_blank" href="http://glidingphenomena.blogspot.com/">
My Blog
</a>
MySQL : Sort by Date and Time together when there are in different columns
Suppose you have date and time in two different columns of your table.
We can sort date and time together by using the ADDTIME function.
You can also use the ADDTIME in the select clause to get data and time together.
We can sort date and time together by using the ADDTIME function.
select * from mytable ORDER BY ADDTIME(mydate, mytime);
You can also use the ADDTIME in the select clause to get data and time together.
select ADDTIME(mydate, mytime), city from mytable
jQuery : Scroll to top/bottom of a specific DIV
Scroll to the bottom of the div:
Scroll to the top of the div:
 $jq('#divWithOverflowAuto').animate({
         scrollTop: $jq('#divWithOverflowAuto')[0].scrollHeight}
      );
 }
 $jq('#divWithOverflowAuto').animate({
   scrollTop: $jq('#divWithOverflowAuto').attr('scrollHeight')}
 );
}
Scroll to the top of the div:
 $jq('#divWithOverflowAuto').animate({
         scrollTop: 0 }
      );
 }
Matlab: Vector product, multiply 2 column matrices, "element-wise" multiplication
If we have 2 column matrices A, B.
>>A = [10;20;30]
A =
10
20
30
>> B = [1;2;3]
B =
1
2
3
>> A+B
ans =
11
22
33
>> A*B
??? Error using ==> mtimes
Inner matrix dimensions must agree.
In order to perform "element-wise" operations, we have to use ".", so for multiplication ".*", division "./"
>> A.*B
ans =
10
40
90
>> A./B
ans =
10
10
10
CakePHP : Error: The requested address “/” was not found on this server
I was moving my cakephp application to a new server and had this issue: Error: The requested address “/” was not found on this server.
The following keys might resolve your issue:
1. Check your DATABASE_CONFIG (/app/config/database.php)
2. Delete all the cache files from all of your tmp subfolders (/app/tmp)
3. Make sure your /app/tmp folder (and all of its sub folders) are writable
If you still have issues with the app, you might have to change the debug switch to 2 or 3 in the /app/config/core.php
Find the line which says "Configure::write" and replace with the following:
Configure::write('debug', 3);
This would spit all the errors on your webpage. You can debug from there.
Mac: removing known hosts/ ssh-rsa keys /RSA key fingerprint.
1. Open known_hosts file located at /Users/username/.ssh/known_hosts or ~/.ssh/known_hosts
2. Delete the CONTENTS of the file.
Since .ssh is a hidden folder, you can show/hide hidden folders using directions at mac-showhide-files-in-mac
2. Delete the CONTENTS of the file.
Since .ssh is a hidden folder, you can show/hide hidden folders using directions at mac-showhide-files-in-mac
Kernighan’s Law !
"Debugging is twice as hard as writing the code in the first place. Therefore, if you write the code as cleverly as possible, you are, by definition, not smart enough to debug it."
Comparing Intel Core i3, i5, i7 processors
Intel Core i3
• Dual Core processor
• Hyper Threading Support (HT)
• Due to HT, this has 2 virtual cores.
• 2 physical cores, 2 virtual cores
• Turbo Boost (dynamic overclocking)
• Integrated graphics processor
• Fabrication : 32nm technology
Intel Core i5 – Dual Core
• Dual Core Processor
• Hyper Threading Support (HT)
• Due to HT, this has 2 virtual cores.
• 2 physical cores, 2 virtual cores
• Turbo Boost (dynamic overclocking)
• Integrated graphics processor
• Fabrication : 32nm technology
Intel Core i5 – Quad Core
• Quad Core Processor
• 4 physical cores.
• Turbo Boost (dynamic overclocking)
• Fabrication : 45nm technology
Intel Core i7
• Quad Core Processor
• Hyper Threading Support (HT)
• Due to HT, this has 8 virtual cores
• 4 physical cores, 8 virtual cores
• Turbo Boost Technology
• Fabrication : 45nm technology
Intel Core i7-980X and i7-970 have 6 physical cores and 12 virtual cores.
CakePHP: Multiple Inserts - Insert multiple rows using single statement.
Using the method saveAll(), we can achieve the desired goal. http://book.cakephp.org/view/75/Saving-Your-Data
Example:
If you want to save multiple records/rows into the same table.
This would result in inserting 3 rows in the "mymodelname" table.
Example:
If you want to save multiple records/rows into the same table.
$multipleRowData = Array(
 Array('name' => 'Bob', 'phone' => "123-123-7777"),
 Array('name' => 'Ann', 'phone' => "987-123-5555"),
 Array('name' => 'Tom', 'phone' => "788-123-4569")
 );
 $this->Mymodelname->saveAll($multipleRowData);
This would result in inserting 3 rows in the "mymodelname" table.
CakePHP: Adding/deleting columns in the database after the application is Baked
If you had already baked the application and now if you made changes to the database by adding or deleting columns, then do the following:
1. Open "core.php" located at : app/config/core.php
2. Find the line which looks like: Configure::write('debug', 0);
3. Change it to Configure::write('debug', 2);
4. Refresh your application webpage.
5. Reset the line in core.php to Configure::write('debug', 0);
What basically this will do is refreshing the "model" cache.
Changing the debug level will ensure that all your databases changes are reloaded.
Following are the notes related to which debug level, you want to set.
/**
* CakePHP Debug Level:
*
* Production Mode:
* 0: No error messages, errors, or warnings shown. Flash messages redirect.
*
* Development Mode:
* 1: Errors and warnings shown, model caches refreshed, flash messages halted.
* 2: As in 1, but also with full debug messages and SQL output.
* 3: As in 2, but also with full controller dump. (NOTE: Not in CakePHP 1.3)
*
* In production mode, flash messages redirect after a time interval.
* In development mode, you need to click the flash message to continue.
*/
jQuery: Count number of visible divs
 $("div:visible").length
 or
 $("div:visible").size()
If we need for a specific 'class', then
 $(".myclass div:visible").length
 or
 $(".myclass div:visible").size()
Subscribe to:
Posts (Atom)