- Go to Window > Preferences > General > Content types
- In the content types window navigate the tree to text > PHP content type
- Click add
- Enter *.ctp or *.thtml depending on what version of CakePHP you use. It might be best to add both - just in case.
- Now navigate to Editors > File Associations
- Enter *.ctp or *.thtml depending on what version of CakePHP you use.
- Under "Associated Editors:", select the PHP Editor and click Default.
Associating CakePHP files ( *.ctp or *.thtml ) with Eclipse
To set up your version of Eclipse to read either file type( *.ctp or *.thtml), follow these steps
Fixing Warning (2): Cannot modify header information - headers already sent by (output started at...
How to fix the following error in PHP
Warning (2): Cannot modify header information - headers already sent by (output started at ...
This is also referred to as "whitespace problem".
The error message typically looks something like
Warning (2): Cannot modify header information - headers already sent by (output started at /Library/WebServer/Documents/test-cake/app/models/post.php:1) [CORE/cake/libs/controller/controller.php, line 644]
Steps to resolve the issue:
1) Find the header() statement that is causing the problem. The error must be at or before this line.
2) Identify statements that could send output to the user before this header statement. Example 'echo ' statements. You cannot have these 'echo' statements before header() statement.
3) Make sure there is no white space before the php start and end tags.
Also at the beginning of the file a blank line before the <?php start tag may look innocent, when processed by PHP, it will turn into an echo statement printing out a blank line. This is a common culprit.
Running Tomcat manager when you start the server through eclipse
You can't open the tomcat manager by hitting http://localhost:8080 URL when you start the server through eclipse. This is because the eclipse by default creates the tomcat server instance separate from your installation and uses its custom config files for starting and stopping the tomcat. And also it deploys the webapps under workspace temporary folders (Ex: .metadata\.plugins\org.eclipse.wst.server.core\tmp0). The solutions is to change the default behavior and
You can switch off this default behavior by fallowing the below steps so that you can login to tomcat manager/admin by hitting the http://localhost:8080 URL.
1. Add a new server by right clicking in the servers perspective of your eclipse.
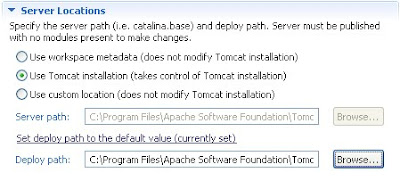
2. Double click on the server added in the above step and change both the server and deploy paths like below.
Server Path : {Tomcat home}
Deploy Path : {Tomcat home}/webapps
3. Start the server.
Note: When you do this, your custom config files will be overwritten in your Tomcat installation each time the tomcat server is started within eclipse. And the manipulation you do through manager/admin will be lost next time the Tomcat server is started in Eclipse.
You can switch off this default behavior by fallowing the below steps so that you can login to tomcat manager/admin by hitting the http://localhost:8080 URL.
1. Add a new server by right clicking in the servers perspective of your eclipse.
2. Double click on the server added in the above step and change both the server and deploy paths like below.
Server Path : {Tomcat home}
Deploy Path : {Tomcat home}/webapps

3. Start the server.
Note: When you do this, your custom config files will be overwritten in your Tomcat installation each time the tomcat server is started within eclipse. And the manipulation you do through manager/admin will be lost next time the Tomcat server is started in Eclipse.
Mac OS X Fixing Warning: mysql_connect(): Can't connect to local MySQL server through socket '/var/mysql/mysql.sock'
How to fix Warning: mysql_connect(): Can't connect to local MySQL server through socket '/var/mysql/mysql.sock'
Apparently, Mac OS X doesn't allow for PHP MySQL connection out of the box. You get this:
Warning: mysql_connect(): Can't connect to local MySQL server through socket '/var/mysql/mysql.sock'
OR In CakePHP
Warning: Could not connect to Database.
I found the most clear fix here:
/etc/php.ini(.default) looks for mysql.sock in the wrong place... two options are to make a symbolic link from the right place to the socket...
sudo mkdir /var/mysql
sudo ln -s /private/tmp/mysql.sock /var/mysql/mysql.sock
Or you can update your php.ini (.default) by finding "mysql.default_socket" and setting it to equal /private/tmp/mysql.sock and then restart apache web server
Using CakePHP BAKE : A Fast and simple start for Web Application
Using CakePHP BAKE feature is really very easy to setup the building stone for the web application with all basic functionalities.
Here are the steps to start baking easily.
Assuming you created your Database....
1. Download the latest stable release from http://cakephp.org/
2. Rename it to your desired app name and place it in your Web Server root directory.
3. Open terminal and goto ur Web Server root directory/urAppName/cake/console
4. Execute the command : ./cake bake
5. Follow the wizard to complete the baking !
Setting WiFi On UBUNTU via Parallels on MAC
It is sometimes grueling when WIFI donot work after installing UBUNTU via Parallels on MAC.
The following might resolve the Wifi issues.
1. Make Sure the following configuration is set for Network Adapter

2. Login into UBUNTU and open Terminal
3. Execute the following commands:
sudo ifconfig eth0 up
sudo dhclient eth0
4. Open Firefox browser. By default it is set to 'Work Offline'.
5. In the Firefox Menu: Open 'File' and uncheck 'Work Offline'
Cool trick in Windows 7
Create a folder on your desktop or anywhere on your system and then rename it like below:
MasterConsole.{ED7BA470-8E54-
The icon will change to the control panel icon and you will have access to EVERYTHING from this one spot. It is very cool I think. The “masterconsole” portion of the statement can named differently if you choose to do so.
Mac: 4 easy steps to Install Tomcat on Mac OSX Snow Leapord
4 easy steps to Install Tomcat on Snow Leopard.
STEP 1: -- Download Tomcat 6, Binary Distribution, under Core (zip or tar.gz) from http://tomcat.apache.org/download-60.cgi
-- Unzip the downloaded package.
STEP 2: -- Change directories to Library
cd /Library
-- Create the Tomcat directory
mkdir Tomcat
-- Copy the unzipped downloaded package: apache-tomcat-6.0.x
-- Paste it in this newly created Directory : /Library/Tomcat.
STEP 3:
-- Edit the shell local startup script. Create if it does not exist.
nano ~/.profile
-- Add the following 2 lines to the .profile file: (BASH)
-- Remember in apache-tomcat-6.0.x, the 'x' refers to what ever version # you have downloaded
export JAVA_HOME=/Library/Java/Home
export CATALINA_HOME=/Library/Tomcat/apache-tomcat-6.0.x
STEP 4:
-- Open a new Terminal window. Execute the following
-- cd /Library/Tomcat/apache-tomcat-6.0.x/conf
-- Edit the tomcat-users.xml file
nano tomcat-users.xml
-- Add the following, where admin is the administrator name you assign and password is the password
-- The tomcat-users.xml file should look something like this:
<tomcat-users>
<!--
<roll rollname="tomcat"/>
<roll rollname="role1"/>
<user username="tomcat" password="tomcat" roles="tomcat" />
<user username="role1" password="tomcat" roles="role1" />
<user username="both" password="tomcat" roles="tomcat,role1" />
-->
<user username="admin" password="password" roles="standard,manager,admin"/>
</tomcat-users>
-- Save the tomcat-users.xml file and quit the editor
And This is it....
Now, to start tomcat
-- Execute the Tomcat startup script located under /Library/Tomcat/apache-tomcat-6.0.x/bin
-- ./startup.sh
-- Test it by opening the page : http://localhost:8080/
Now, to stop tomcat
-- Execute the Tomcat startup script located under /Library/Tomcat/apache-tomcat-6.0.x/bin
-- ./shutdown.sh
Useful AJAX Modal windows using javascript frameworks
This is an interesting link which has 30 useful AJAX Modal windows implemented using javascript frameworks.
These have neat little descriptions about the framework it uses.
It is easy to pick the solution based on the current javascript framework your using !
http://www.dottony.com/30-useful-ajax-lightbox-and-modal-dialog-solutions/
These have neat little descriptions about the framework it uses.
It is easy to pick the solution based on the current javascript framework your using !
http://www.dottony.com/30-useful-ajax-lightbox-and-modal-dialog-solutions/
Installing UBUNTU on MAC using Parallels Desktop
To install any Linux guest OS on Parallels Desktop, we need to download the respective .dmg from http://www.parallels.com/ptn/download/va/?categ=5&sort=rating&lsort=www
Now at this time, the latest release of UBUNTU for Parallels is 8.04.1 and is available at http://www.parallels.com/ptn/download/va/?va_id=228 Click getApp and download the .dmg.
I tried downloading .iso files directly from ubuntu site but could not set it up as it asks for a partition !
Also no luck downloading the CentOS.iso from its site, it wouldn't even create the VM.
Windows 7 gets installed fine !
Now at this time, the latest release of UBUNTU for Parallels is 8.04.1 and is available at http://www.parallels.com/ptn/download/va/?va_id=228 Click getApp and download the .dmg.
Administration Interfaces:
GUI
Login: ubuntu
Password: 123
Login: ubuntu
Password: 123
I tried downloading .iso files directly from ubuntu site but could not set it up as it asks for a partition !
Also no luck downloading the CentOS.iso from its site, it wouldn't even create the VM.
Windows 7 gets installed fine !
Get names of month, weekday of the year for any date value in PHP
To get the names of month, weekday, of the year for any date value in PHP, use the function getDate();
Example:
$datePieces = getDate(strtotime($mydate));
echo "Month name: ".$datePieces['month'];
echo "Weekday name: ".$datePieces['weekday'];
Make sure to use quotes for the key value like $datePieces['month'] instead $datePieces[month], since it would throw : Notice: Use of undefined constant ....
The associative array $datePieces contains all of the following:
Array
(
    [seconds] => 40
    [minutes] => 58
    [hours]   => 21
    [mday]    => 17
    [wday]    => 2
    [mon]     => 6
    [year]    => 2003
    [yday]    => 167
    [weekday] => Tuesday
    [month]   => June
    [0]       => 1055901520
)
Subscribe to:
Posts (Atom)