 $today = date('Y-m-d');
 $tomorrow = date('Y-m-d', strtotime('tomorrow'));
 $yesterday = date('Y-m-d', strtotime('yesterday'));
PHP: Today, Yesterday, Tomorrow dates
In PHP, we can generate Today, Yesterday, Tomorrow Dates the following way:
MySQL: Make a copy of an existing table in MySQL
We can create a copy of an existing table using the following SQL statements.
 CREATE TABLE booger_copy LIKE testing.booger;
 INSERT booger_copy SELECT * FROM testing.booger;
Mac: Running 32-bit JVM on Mac OSX using eclipse
I had to use SMILE API on 64-bit Mac OSX machine.
SMILE API provides 32-bit version of their binaries.
I found a way to use 32-bit JVM in Mac OSX 64bit machines using Eclipse.
By default Mac OSX comes with both 32 bit and 64bit JVM installed.
Eclipse uses 64-bit JVM by default.
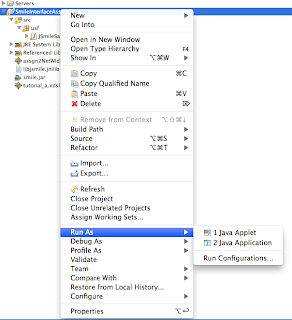
In order to use the 32-bit JVM, do the following in Eclipse
1. Right Click on your project, goto "Run As", Select "Run Configurations"
2. Select the Arguments tab,
3. Add “-d32″ in VM arguments field.
SMILE API provides 32-bit version of their binaries.
I found a way to use 32-bit JVM in Mac OSX 64bit machines using Eclipse.
By default Mac OSX comes with both 32 bit and 64bit JVM installed.
Eclipse uses 64-bit JVM by default.
In order to use the 32-bit JVM, do the following in Eclipse
1. Right Click on your project, goto "Run As", Select "Run Configurations"
2. Select the Arguments tab,
3. Add “-d32″ in VM arguments field.


Using Filezilla to login into Amazon EC2 instance and transfer files
We can login into Amazon EC2 instance using Filezilla FTP client for simple transfers of local files.
Following are the steps:
1. Download and install Filezilla client.
2. Goto Filezilla settings(Windows) or Filezlla preferences (MAC)
3. Click on SFTP, on right side, click on add key file.

4. Select your .pem file. It will prompt you to convert into PPK file.


5. Click ok to close the settings/preferences window.
6. Open site manager, create a new site as show in the image below.
Host: your AMI address
ServerType: SFTP
Logon Tpe: Normal
User: ec2-user
No password required ! Filezilla will read through the keys and find the right key for the user/server pair that you are connecting to.

Using cURLpp software
To use the curlpp, we need to first install.
Download the package at http://curlpp.org/index.php/download
The simplest way to compile this package is:
1. `cd' to the directory containing the package's source code and type
`./configure'
2. Type `make' to compile the package.
3. Type `make install' to install, if error occurs do 'sudo make install'
4. You can remove the program binaries and object files from the
source code directory by typing `make clean'.
After installing, there are several examples at http://curlpp.org/index.php/examples
cURLpp is a C++ wrapper for libcURL.
libcURL is described as:
a free and easy-to-use client-side URL transfer library, supporting FTP, FTPS, HTTP, HTTPS, GOPHER, TELNET, DICT, FILE and LDAP. libcurl supports HTTPScertificates, HTTP POST, HTTP PUT, FTP uploading, kerberos, HTTP form based upload, proxies, cookies, user+password authentication, file transfer resume, http proxy tunneling and more!
PHP: exec command to get std errors
By appending 2>&1 at the end of the command will redirect errors from stderr to stdout.
Example:
If you run a simple command like cc at the command prompt, you would get the output as following
Example:
If you run a simple command like cc at the command prompt, you would get the output as following
 $ cc
 i686-apple-darwin10-gcc-4.2.1: no input files
 $
 $cmd = "cc";
 exec($cmd,$out);
 print_r($out);
Array ( )
 $cmd = "cc 2>&1";
 exec($cmd,$out);
 print_r($out);
Array ( [0] => i686-apple-darwin10-gcc-4.2.1: no input files )
Mac: location of Apache web server logs
The following location contains error_log for apache web server in Mac machines
/var/log/apache2/
Mac: Flush DNS cache in Snow Leapord
Run the following command in the terminal
sudo dscacheutil -flushcache
For Windows:
ipconfig /flushdns
sudo dscacheutil -flushcache
For Windows:
ipconfig /flushdns
HTML: Open link in a new window
The key to use is target="_blank"
Eg:
Eg:
 <a  target="_blank" href="http://glidingphenomena.blogspot.com/">
My Blog
</a>
MySQL : Sort by Date and Time together when there are in different columns
Suppose you have date and time in two different columns of your table.
We can sort date and time together by using the ADDTIME function.
You can also use the ADDTIME in the select clause to get data and time together.
We can sort date and time together by using the ADDTIME function.
select * from mytable ORDER BY ADDTIME(mydate, mytime);
You can also use the ADDTIME in the select clause to get data and time together.
select ADDTIME(mydate, mytime), city from mytable
jQuery : Scroll to top/bottom of a specific DIV
Scroll to the bottom of the div:
Scroll to the top of the div:
 $jq('#divWithOverflowAuto').animate({
         scrollTop: $jq('#divWithOverflowAuto')[0].scrollHeight}
      );
 }
 $jq('#divWithOverflowAuto').animate({
   scrollTop: $jq('#divWithOverflowAuto').attr('scrollHeight')}
 );
}
Scroll to the top of the div:
 $jq('#divWithOverflowAuto').animate({
         scrollTop: 0 }
      );
 }
Matlab: Vector product, multiply 2 column matrices, "element-wise" multiplication
If we have 2 column matrices A, B.
>>A = [10;20;30]
A =
10
20
30
>> B = [1;2;3]
B =
1
2
3
>> A+B
ans =
11
22
33
>> A*B
??? Error using ==> mtimes
Inner matrix dimensions must agree.
In order to perform "element-wise" operations, we have to use ".", so for multiplication ".*", division "./"
>> A.*B
ans =
10
40
90
>> A./B
ans =
10
10
10
CakePHP : Error: The requested address “/” was not found on this server
I was moving my cakephp application to a new server and had this issue: Error: The requested address “/” was not found on this server.
The following keys might resolve your issue:
1. Check your DATABASE_CONFIG (/app/config/database.php)
2. Delete all the cache files from all of your tmp subfolders (/app/tmp)
3. Make sure your /app/tmp folder (and all of its sub folders) are writable
If you still have issues with the app, you might have to change the debug switch to 2 or 3 in the /app/config/core.php
Find the line which says "Configure::write" and replace with the following:
Configure::write('debug', 3);
This would spit all the errors on your webpage. You can debug from there.
Mac: removing known hosts/ ssh-rsa keys /RSA key fingerprint.
1. Open known_hosts file located at /Users/username/.ssh/known_hosts or ~/.ssh/known_hosts
2. Delete the CONTENTS of the file.
Since .ssh is a hidden folder, you can show/hide hidden folders using directions at mac-showhide-files-in-mac
2. Delete the CONTENTS of the file.
Since .ssh is a hidden folder, you can show/hide hidden folders using directions at mac-showhide-files-in-mac
Kernighan’s Law !
"Debugging is twice as hard as writing the code in the first place. Therefore, if you write the code as cleverly as possible, you are, by definition, not smart enough to debug it."
Comparing Intel Core i3, i5, i7 processors
Intel Core i3
• Dual Core processor
• Hyper Threading Support (HT)
• Due to HT, this has 2 virtual cores.
• 2 physical cores, 2 virtual cores
• Turbo Boost (dynamic overclocking)
• Integrated graphics processor
• Fabrication : 32nm technology
Intel Core i5 – Dual Core
• Dual Core Processor
• Hyper Threading Support (HT)
• Due to HT, this has 2 virtual cores.
• 2 physical cores, 2 virtual cores
• Turbo Boost (dynamic overclocking)
• Integrated graphics processor
• Fabrication : 32nm technology
Intel Core i5 – Quad Core
• Quad Core Processor
• 4 physical cores.
• Turbo Boost (dynamic overclocking)
• Fabrication : 45nm technology
Intel Core i7
• Quad Core Processor
• Hyper Threading Support (HT)
• Due to HT, this has 8 virtual cores
• 4 physical cores, 8 virtual cores
• Turbo Boost Technology
• Fabrication : 45nm technology
Intel Core i7-980X and i7-970 have 6 physical cores and 12 virtual cores.
CakePHP: Multiple Inserts - Insert multiple rows using single statement.
Using the method saveAll(), we can achieve the desired goal. http://book.cakephp.org/view/75/Saving-Your-Data
Example:
If you want to save multiple records/rows into the same table.
This would result in inserting 3 rows in the "mymodelname" table.
Example:
If you want to save multiple records/rows into the same table.
$multipleRowData = Array(
 Array('name' => 'Bob', 'phone' => "123-123-7777"),
 Array('name' => 'Ann', 'phone' => "987-123-5555"),
 Array('name' => 'Tom', 'phone' => "788-123-4569")
 );
 $this->Mymodelname->saveAll($multipleRowData);
This would result in inserting 3 rows in the "mymodelname" table.
CakePHP: Adding/deleting columns in the database after the application is Baked
If you had already baked the application and now if you made changes to the database by adding or deleting columns, then do the following:
1. Open "core.php" located at : app/config/core.php
2. Find the line which looks like: Configure::write('debug', 0);
3. Change it to Configure::write('debug', 2);
4. Refresh your application webpage.
5. Reset the line in core.php to Configure::write('debug', 0);
What basically this will do is refreshing the "model" cache.
Changing the debug level will ensure that all your databases changes are reloaded.
Following are the notes related to which debug level, you want to set.
/**
* CakePHP Debug Level:
*
* Production Mode:
* 0: No error messages, errors, or warnings shown. Flash messages redirect.
*
* Development Mode:
* 1: Errors and warnings shown, model caches refreshed, flash messages halted.
* 2: As in 1, but also with full debug messages and SQL output.
* 3: As in 2, but also with full controller dump. (NOTE: Not in CakePHP 1.3)
*
* In production mode, flash messages redirect after a time interval.
* In development mode, you need to click the flash message to continue.
*/
jQuery: Count number of visible divs
 $("div:visible").length
 or
 $("div:visible").size()
If we need for a specific 'class', then
 $(".myclass div:visible").length
 or
 $(".myclass div:visible").size()
HTML : Easiest way to create simple tooltips
Tooltips are the ones which appear as little bubbles with text, when you mouse hover over an item on Web-page.
In HTML, it is very easy to create them.
Simply add 'title' attribute to the element.
Examples:
In HTML, it is very easy to create them.
Simply add 'title' attribute to the element.
Examples:
<a title="Tooltip for Anchor !" href="someLink" >Gliding Phenomena Blog </a>

<img title="Tooltip on an Image..." src="myPic.jpg"  />

<div title="This is tooltip for the entire DIV">

Some content.

Blah

Blah

</div>
Subscribe to:
Posts (Atom)